
Abstract: A Guided Tour for your first steps with your new lighting kit.
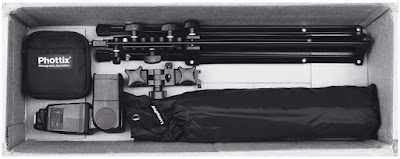
Okay, so the UPS guy has just dropped off your box of new lighting gear. What do you do with it? Where do you start?
That is exactly the gap we explore in person whenever I teach a beginner's lighting class (with exactly this gear, by the way.) So today we are going to walk through a "first steps" exercise with your new gear. If you are reading ahead just to explore, fine. Just make sure you come back to this page when your kit arrives.
Today we will be working with a standard JumpStarter kit. First we are going to put it together, then we are going to use it to make some simple, dramatic portraits.
Assembling Your Lighting Kit
Most of this is pretty obvious. But we are going to walk through it, step-by-step anyway. Just to be sure. You'll soon be doing it without a second thought.
Open up your light stand and extend it until the top is about at eye level. We can adjust this height easily later, but you may as well be assembling your swivel, remote, flash and umbrella at an easy-to-see working height.
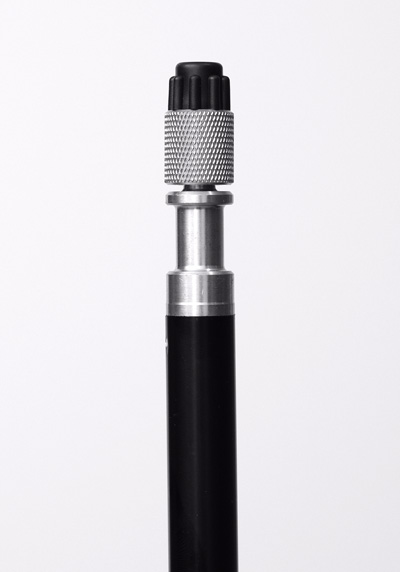
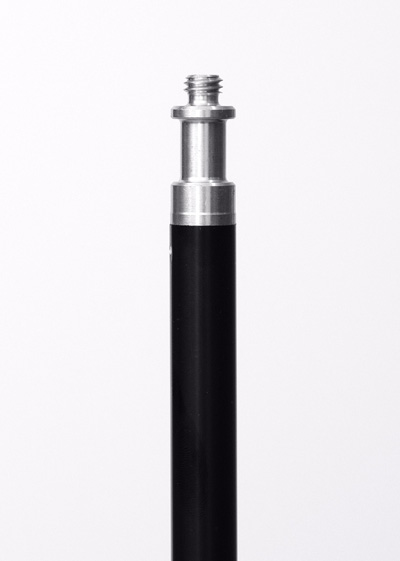
Unscrew the little brass adapter that comes atop your light stand and stow it in your lighting bag. It is there in case you every need to convert the 3/8" male thread atop your stand into a ¼"x20 male thread. It's not something you'll often use.
PLEASE NOTE: Jumpstarter kits are now shipping with an improved version of the swivel shown in these photos: it has a better locking arm and bigger thumb screw. So if yours looks different than the version shown, congrats.
Take out your umbrella swivel. There is a brass stud inserted at each end. Loosen the clamp screw that holds each in place and remove the two brass studs.
One of the studs is a "male" version and is attached to a black "cold shoe." We will be using that stud today. The other brass stud is has two female ends, and can be used later to mount your flash to a variety of DIY mounts. So save that extra female brass stud for later.
One end of the swivel has a near-perpendicular "umbrella mounting hole." That is the top end of the swivel. Mount the bottom end to the top of your light stand and clamp it down.
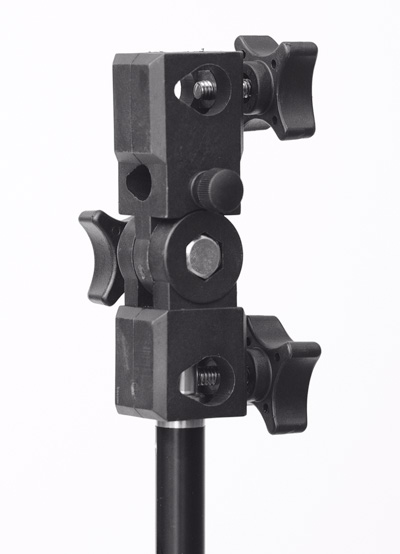
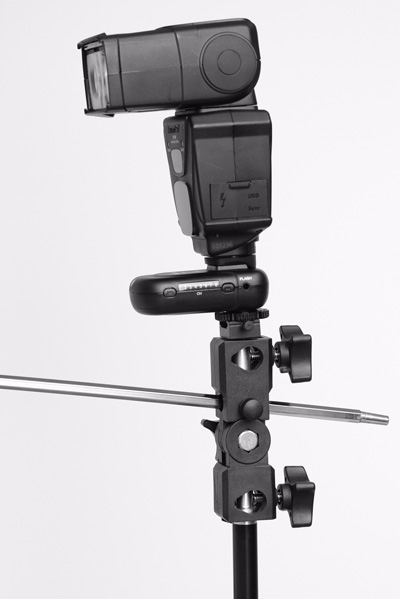
Then insert the stud with the cold shoe into the top hole, and clamp that down.
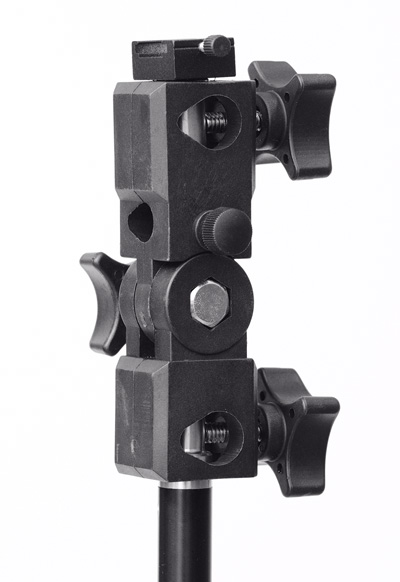
Here (above) is how it should look, from top to bottom: Cold shoe stud -> end of swivel that has the umbrella hole in it -> (elbow of the swivel) -> open-holed end -> light stand.
If you mounted it upside down, it will become obvious when you go to put in your umbrella in a moment.
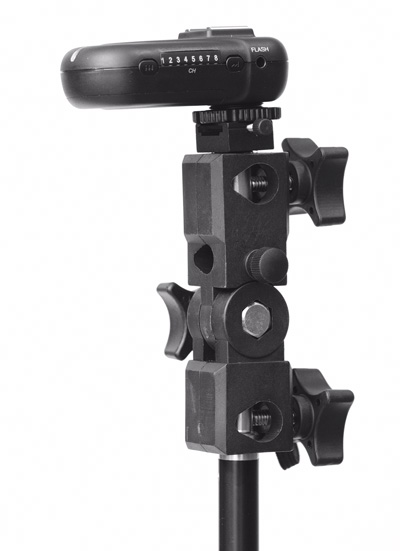
Install two AA batteries in your Phottix Ares receiver (the unit without the mount that swivels 90 degrees) and mount it to the cold shoe as shown:
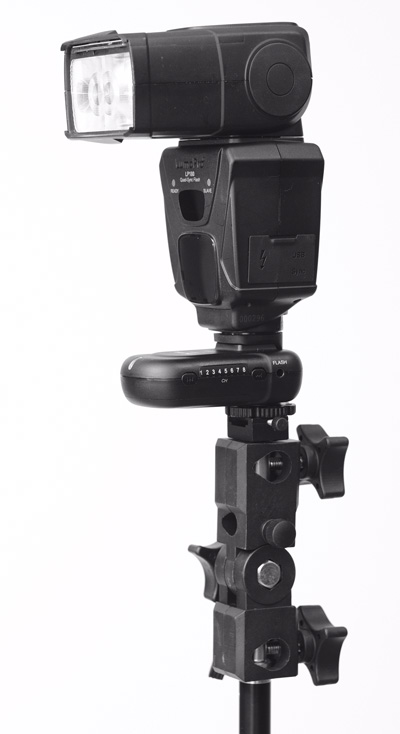
Mount your flash into the hot shoe of the remote receiver as shown:
Take out your umbrella and open it up. If your umbrella has a black backing, remove it. We will be starting out using it as a "white shoot-through" umbrella.
Next, mount your umbrella into the umbrella hole as shown. The shaft of the umbrella should run a little "uphill" compared to the orientation of the swivel. If it runs "downhill" you have it in backwards. This is the correct way:
Now that it is assembled, let's test that remote trigger setup. Put the other two AA batteries into the remote transmitter. Turn on your flash, the remote receiver and the remote transmitter. Set the flash to a midrange power level, such as 1/4 power, in manual mode. (You may have to consult your flash's instructions if you have never done this before. But it is easy.)
The Ares remotes have 8 channels, and a selector on the transmitter to fire all channels at once. Make sure your transmitter and receiver are set to the same channel. It doesn't matter which channel, just that the transmitter and receiver are both set to the same one.
Now press the test button on your transmitter. If you are set up correctly, the flash should fire into your umbrella. If not, check to make sure the flash is turned on, seated well in the remote receiver and that it has not fallen into sleep mode.
__________
Okay, Let's Make Some Photos!
This little newb exercise is adapted from a class I teach at Gulf Photo Plus in Dubai every year, and it is designed for complete beginners. So if that is you, you're in the right place.
We're going to start with something very simple: an all-flash umbrella portrait. No ambient (i.e., continuous) light, just flash. This is good, as there is only one thing to worry about.
To that end, we'll be working indoors with a simple plain background. We used medium gray paper, as you can see above. I am also switching the camera to shoot black and white, so we can just concentrate on light and form without the distraction of color.
First, We'll Kill the Ambient Light
Every time you take a flash photo, you are taking two photos at once: an ambient photo overlaid onto a flash photo. It's all light, and it is all cumulative in your exposure. To kill the ambient light portion of the photo (and make things easier for you) we'll just dial in our exposure so the ambient portion of the photo will be black (or near to it.)
Set your ISO to something moderate, say ISO 200. Now, close down your shutter speed until you are at your maximum sync speed. It should be marked—maybe with an "X"—and will likely be 1/250th or 1/200th or 1/180th. If you are not sure what your maximum sync speed on your camera is, consult your manual or ask someone who is familiar with your camera.
So, the ISO and shutter speed setting is designed to get rid of a lot of ambient light. Now let's close down the aperture to, oh, say f/8. In a normal room, ISO 200 at (or near) 1/180th and f/8 is going to make a dark available light photo. If not black, then very dark. And that's fine.
Now, let's add our flash to that, knowing it will likely be the only thing influencing your image.
Now Let's Add Some Flash
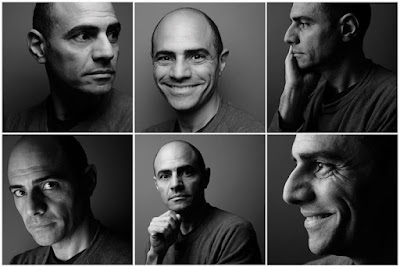
We are going to use Tarek, one of my students on whom I quickly demo'd this exercise, as our subject. We are literally going to take a walk around his head with our light and just see what happens.
Also, these are straight out of the camera. If you look, you'll notice a blemish on the background paper that is not even getting cloned out. The exposures are what they are. I am purposefully not correcting them to illustrate that, as long as you don't change your distances very much, your exposures should be fine from setup to setup.
__________
Let's mount our flash in our shoot-through umbrella. Which is itself mounted to your light stand (via the umbrella swivel adapter). This combo pretty much allows you to position your light source wherever you want in 3-D space. Next, connect the flash to your camera via either a sync cord or remote trigger. Now, when you fire your camera, your (off-camera) flash will also fire.
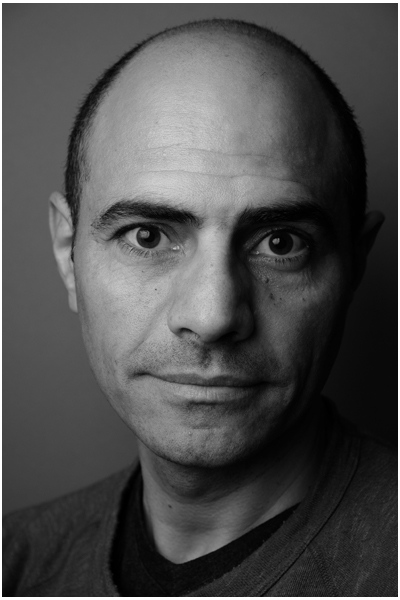
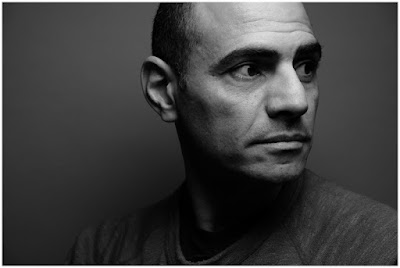
Set your flash to manual, at 1/8 power. Set the "zoom" setting (on your flash) to 50mm or 35mm to fill the umbrella without the raw light spraying past the edges. Put your umbrella about 45 degrees up and over to the left (that is the side I chose, but it's arbitrary) with the umbrella front surface at about three feet away from your subject.
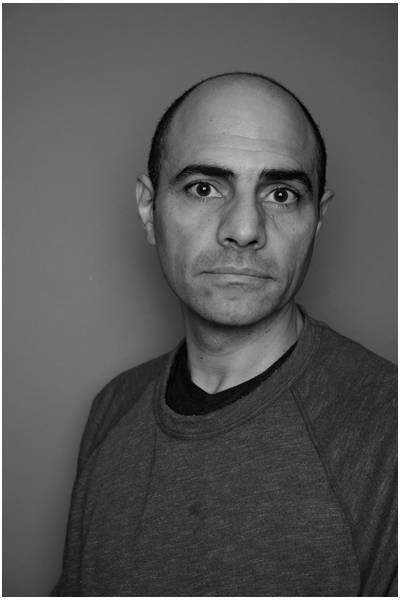
Take a test shot. If it is too bright, dial down the power level of your flash. (Like, to 1/16th or 1/32 power or some setting in between.) Or vice versa. When you get your flash exposure (literally) dialed in, your photo should look something like this:
Is this awesome or what? We literally just started and we already have a classic 45/45 (45 degrees up and 45 degrees over) B&W portrait. Simple, and classic. When is the last time your flash made someone look this cool? Probably never—unless you have prevously gotten it off of your camera.
If you have a weird, umbrella-edge-shaped shadow on the wall, your raw flash light may be spilling past the edge of the umbrella. In that case, zoom in the flash a little bit or choke up the umbrella shaft on the swivel adapter and fix it. Or maybe even just rotate your umbrella a tad toward the wall. You'll figure it out.
So, look at the shape and character the 45/45 (up and over) light gives to a face. Let's play with that some.
We are going to move the light around Tarek's head a bit. If we keep our distance the same, our exposure will be the same. If we move closer with the flash, it will be brighter on him. So we'll just remove some power from the flash at the manual power setting (as we did if your flash was too bright.) Or vice versa if we move the flash further away. Just try it and see. It is less like math and more like cooking.
Now Let's Move That Light Around
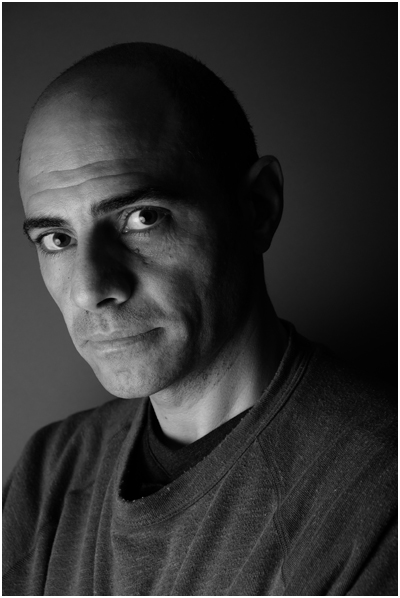
Let's reposition our flash until it is firing right over the head and shoulders of the photographer. So it will be on-axis with the subject, but "up" a little bit:

The shadows are different. There is more revealed detail in the full face. It's a different mood. There is now a tell-tale butterfly-shaped shadow under Tarek's nose. Which is why on-axis (but "up higher") light is often called "butterfly lighting."
This is fun, no? Let's keep going.
Drop the light down a little, so your head and shoulders are basically in front of bottom of the umbrella. The light is wrapping around you and you are pretty much lighting your subject on-axis.
Now his face (and the photo) looks different yet again:
Okay, now let's play with distance. Go back to your previous 45/45 positiion (up and over) and move that light in reeeeally close. Take an exposure test. Too bright, right? You'll have to dial the power of the flash down a bit to get your proper exposure back.
See how the light looks bigger, softer? That's because it is much closer to your subject's face, and appears to him to be bigger. (That's what counts with lighting.)
Okay, enough with this typical flattering light. Let's amp up the character aspect a bit. And this is what I loooove about lighting. You are in control.
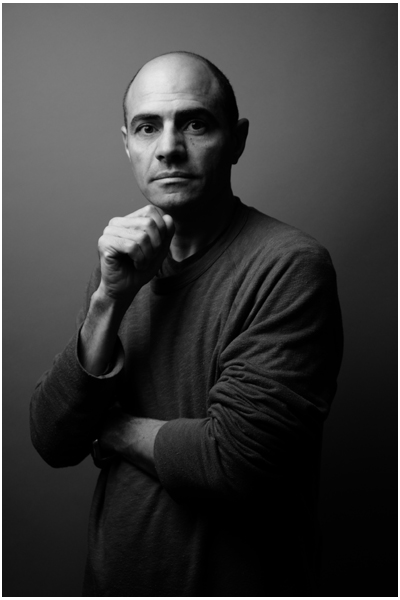
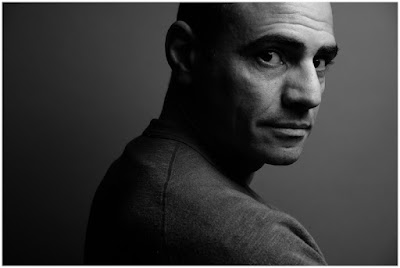
Let's bring our light around to camera left (Tarek's right) for a moody profile shot. If you have changed your distance, you'll have to readjust your flash power to get a proper exposure. Or even if you have not changed your distance, you'll often find lighting a person in profile is somehow more efficient (light skims off of them very efficiently) and you have to drop your flash exposure anyway.
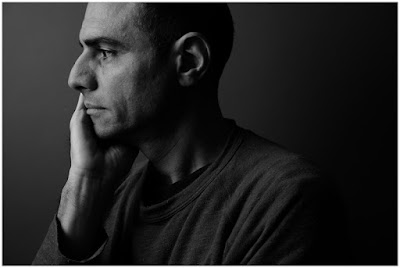
Oh that looks cool. Tarek in contemplation. Mr. Deep Thought.
Let's push it further around him to our left. Now the light is actually a little behind him, to camera left. So we call more attention to his face:
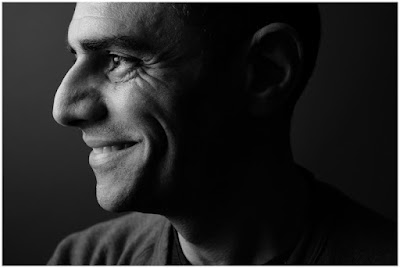
Has more of an emotional feel to it, maybe. Okay, let's drop that baby down a bit, still staying at camera left:
Okay, this is more Tarek the Homicide Detective in the crime drama, right? Same room, same guy, same light, same umbrella—we literally just dropped the light down two feet. I love this stuff.
Let's go the other way. Grab a friend and have them suspend that umbrella (just hold the stand, it's not hard) up over Tarek's head. Point that umbrella straight down and see what happens.
Hmm. If the previous shot was Homicide Detective, this may be trending a little toward the criminal in that same movie, right? Let's walk that light a little more to the right (still up top, tho) and have Tarek throw us a look over his shoulder.
Oh yeah, definitely a criminal look now. Don't mess with top-lit, glancing-over-the-shoulder Tarek. He'd surely kill you as soon as look at you.
__________
So Little Gear, So Much Cool
Be honest: are you a little surprised at how easy it is to take the first steps into creating beautifully lit photos? Most people are, when they try it for the first time.
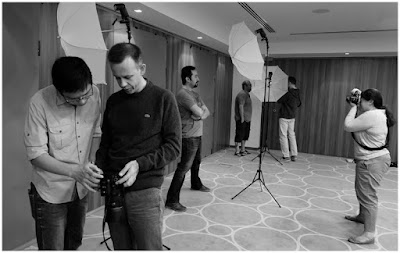
I love this stuff. Always have, since I started doing it over 25 years ago. And it is really easy to learn, but you have to actually do it to learn it. I can explain to you how to ride a bicycle, but until you get on one and actually do it, you won't really know how.
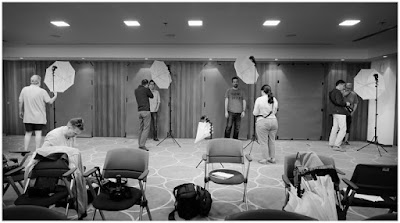
And that's exactly what these guys are doing here. And every single one of them was coming up with photos just like the ones above in relatively short order. Just by playing around.
And that is the secret: you have to actually do it. You have to play. You have to experiment. And if you are willing to do that, you'll learn this stuff very quickly.
__________
This was a walk-through of your first steps in lighting. Yours might not look exactly like mine, but you should be starting to get an idea with a bit of practice. Simple, beginning umbrella light is pretty cool, huh?
But there are lots of ways to shape your off-camera light—and even more interesting ways to use your umbrella. We'll take a look at that next.
Next: Get to Know Your Umbrella

Okay, so the UPS guy has just dropped off your box of new lighting gear. What do you do with it? Where do you start?
That is exactly the gap we explore in person whenever I teach a beginner's lighting class (with exactly this gear, by the way.) So today we are going to walk through a "first steps" exercise with your new gear. If you are reading ahead just to explore, fine. Just make sure you come back to this page when your kit arrives.

Today we will be working with a standard JumpStarter kit. First we are going to put it together, then we are going to use it to make some simple, dramatic portraits.
Assembling Your Lighting Kit
Most of this is pretty obvious. But we are going to walk through it, step-by-step anyway. Just to be sure. You'll soon be doing it without a second thought.
Open up your light stand and extend it until the top is about at eye level. We can adjust this height easily later, but you may as well be assembling your swivel, remote, flash and umbrella at an easy-to-see working height.
Unscrew the little brass adapter that comes atop your light stand and stow it in your lighting bag. It is there in case you every need to convert the 3/8" male thread atop your stand into a ¼"x20 male thread. It's not something you'll often use.
PLEASE NOTE: Jumpstarter kits are now shipping with an improved version of the swivel shown in these photos: it has a better locking arm and bigger thumb screw. So if yours looks different than the version shown, congrats.
Take out your umbrella swivel. There is a brass stud inserted at each end. Loosen the clamp screw that holds each in place and remove the two brass studs.
One of the studs is a "male" version and is attached to a black "cold shoe." We will be using that stud today. The other brass stud is has two female ends, and can be used later to mount your flash to a variety of DIY mounts. So save that extra female brass stud for later.
One end of the swivel has a near-perpendicular "umbrella mounting hole." That is the top end of the swivel. Mount the bottom end to the top of your light stand and clamp it down.
Then insert the stud with the cold shoe into the top hole, and clamp that down.
Here (above) is how it should look, from top to bottom: Cold shoe stud -> end of swivel that has the umbrella hole in it -> (elbow of the swivel) -> open-holed end -> light stand.
If you mounted it upside down, it will become obvious when you go to put in your umbrella in a moment.
Install two AA batteries in your Phottix Ares receiver (the unit without the mount that swivels 90 degrees) and mount it to the cold shoe as shown:
Mount your flash into the hot shoe of the remote receiver as shown:
Take out your umbrella and open it up. If your umbrella has a black backing, remove it. We will be starting out using it as a "white shoot-through" umbrella.
Next, mount your umbrella into the umbrella hole as shown. The shaft of the umbrella should run a little "uphill" compared to the orientation of the swivel. If it runs "downhill" you have it in backwards. This is the correct way:
Now that it is assembled, let's test that remote trigger setup. Put the other two AA batteries into the remote transmitter. Turn on your flash, the remote receiver and the remote transmitter. Set the flash to a midrange power level, such as 1/4 power, in manual mode. (You may have to consult your flash's instructions if you have never done this before. But it is easy.)
The Ares remotes have 8 channels, and a selector on the transmitter to fire all channels at once. Make sure your transmitter and receiver are set to the same channel. It doesn't matter which channel, just that the transmitter and receiver are both set to the same one.
Now press the test button on your transmitter. If you are set up correctly, the flash should fire into your umbrella. If not, check to make sure the flash is turned on, seated well in the remote receiver and that it has not fallen into sleep mode.
__________
Okay, Let's Make Some Photos!

This little newb exercise is adapted from a class I teach at Gulf Photo Plus in Dubai every year, and it is designed for complete beginners. So if that is you, you're in the right place.
We're going to start with something very simple: an all-flash umbrella portrait. No ambient (i.e., continuous) light, just flash. This is good, as there is only one thing to worry about.
To that end, we'll be working indoors with a simple plain background. We used medium gray paper, as you can see above. I am also switching the camera to shoot black and white, so we can just concentrate on light and form without the distraction of color.
First, We'll Kill the Ambient Light
Every time you take a flash photo, you are taking two photos at once: an ambient photo overlaid onto a flash photo. It's all light, and it is all cumulative in your exposure. To kill the ambient light portion of the photo (and make things easier for you) we'll just dial in our exposure so the ambient portion of the photo will be black (or near to it.)
Set your ISO to something moderate, say ISO 200. Now, close down your shutter speed until you are at your maximum sync speed. It should be marked—maybe with an "X"—and will likely be 1/250th or 1/200th or 1/180th. If you are not sure what your maximum sync speed on your camera is, consult your manual or ask someone who is familiar with your camera.
So, the ISO and shutter speed setting is designed to get rid of a lot of ambient light. Now let's close down the aperture to, oh, say f/8. In a normal room, ISO 200 at (or near) 1/180th and f/8 is going to make a dark available light photo. If not black, then very dark. And that's fine.
Now, let's add our flash to that, knowing it will likely be the only thing influencing your image.
Now Let's Add Some Flash
We are going to use Tarek, one of my students on whom I quickly demo'd this exercise, as our subject. We are literally going to take a walk around his head with our light and just see what happens.
Also, these are straight out of the camera. If you look, you'll notice a blemish on the background paper that is not even getting cloned out. The exposures are what they are. I am purposefully not correcting them to illustrate that, as long as you don't change your distances very much, your exposures should be fine from setup to setup.
__________
Let's mount our flash in our shoot-through umbrella. Which is itself mounted to your light stand (via the umbrella swivel adapter). This combo pretty much allows you to position your light source wherever you want in 3-D space. Next, connect the flash to your camera via either a sync cord or remote trigger. Now, when you fire your camera, your (off-camera) flash will also fire.
Set your flash to manual, at 1/8 power. Set the "zoom" setting (on your flash) to 50mm or 35mm to fill the umbrella without the raw light spraying past the edges. Put your umbrella about 45 degrees up and over to the left (that is the side I chose, but it's arbitrary) with the umbrella front surface at about three feet away from your subject.
Take a test shot. If it is too bright, dial down the power level of your flash. (Like, to 1/16th or 1/32 power or some setting in between.) Or vice versa. When you get your flash exposure (literally) dialed in, your photo should look something like this:
Is this awesome or what? We literally just started and we already have a classic 45/45 (45 degrees up and 45 degrees over) B&W portrait. Simple, and classic. When is the last time your flash made someone look this cool? Probably never—unless you have prevously gotten it off of your camera.
If you have a weird, umbrella-edge-shaped shadow on the wall, your raw flash light may be spilling past the edge of the umbrella. In that case, zoom in the flash a little bit or choke up the umbrella shaft on the swivel adapter and fix it. Or maybe even just rotate your umbrella a tad toward the wall. You'll figure it out.
So, look at the shape and character the 45/45 (up and over) light gives to a face. Let's play with that some.
We are going to move the light around Tarek's head a bit. If we keep our distance the same, our exposure will be the same. If we move closer with the flash, it will be brighter on him. So we'll just remove some power from the flash at the manual power setting (as we did if your flash was too bright.) Or vice versa if we move the flash further away. Just try it and see. It is less like math and more like cooking.
Now Let's Move That Light Around
Let's reposition our flash until it is firing right over the head and shoulders of the photographer. So it will be on-axis with the subject, but "up" a little bit:
The shadows are different. There is more revealed detail in the full face. It's a different mood. There is now a tell-tale butterfly-shaped shadow under Tarek's nose. Which is why on-axis (but "up higher") light is often called "butterfly lighting."
This is fun, no? Let's keep going.
Drop the light down a little, so your head and shoulders are basically in front of bottom of the umbrella. The light is wrapping around you and you are pretty much lighting your subject on-axis.
Now his face (and the photo) looks different yet again:
Okay, now let's play with distance. Go back to your previous 45/45 positiion (up and over) and move that light in reeeeally close. Take an exposure test. Too bright, right? You'll have to dial the power of the flash down a bit to get your proper exposure back.
See how the light looks bigger, softer? That's because it is much closer to your subject's face, and appears to him to be bigger. (That's what counts with lighting.)
Okay, enough with this typical flattering light. Let's amp up the character aspect a bit. And this is what I loooove about lighting. You are in control.
Let's bring our light around to camera left (Tarek's right) for a moody profile shot. If you have changed your distance, you'll have to readjust your flash power to get a proper exposure. Or even if you have not changed your distance, you'll often find lighting a person in profile is somehow more efficient (light skims off of them very efficiently) and you have to drop your flash exposure anyway.

Oh that looks cool. Tarek in contemplation. Mr. Deep Thought.
Let's push it further around him to our left. Now the light is actually a little behind him, to camera left. So we call more attention to his face:

Has more of an emotional feel to it, maybe. Okay, let's drop that baby down a bit, still staying at camera left:
Okay, this is more Tarek the Homicide Detective in the crime drama, right? Same room, same guy, same light, same umbrella—we literally just dropped the light down two feet. I love this stuff.
Let's go the other way. Grab a friend and have them suspend that umbrella (just hold the stand, it's not hard) up over Tarek's head. Point that umbrella straight down and see what happens.

Hmm. If the previous shot was Homicide Detective, this may be trending a little toward the criminal in that same movie, right? Let's walk that light a little more to the right (still up top, tho) and have Tarek throw us a look over his shoulder.

Oh yeah, definitely a criminal look now. Don't mess with top-lit, glancing-over-the-shoulder Tarek. He'd surely kill you as soon as look at you.
__________
So Little Gear, So Much Cool

Be honest: are you a little surprised at how easy it is to take the first steps into creating beautifully lit photos? Most people are, when they try it for the first time.
I love this stuff. Always have, since I started doing it over 25 years ago. And it is really easy to learn, but you have to actually do it to learn it. I can explain to you how to ride a bicycle, but until you get on one and actually do it, you won't really know how.
And that's exactly what these guys are doing here. And every single one of them was coming up with photos just like the ones above in relatively short order. Just by playing around.
And that is the secret: you have to actually do it. You have to play. You have to experiment. And if you are willing to do that, you'll learn this stuff very quickly.
__________
This was a walk-through of your first steps in lighting. Yours might not look exactly like mine, but you should be starting to get an idea with a bit of practice. Simple, beginning umbrella light is pretty cool, huh?
But there are lots of ways to shape your off-camera light—and even more interesting ways to use your umbrella. We'll take a look at that next.
Next: Get to Know Your Umbrella
Your Basic Lighting Kit: A Spin Around the Block
 Reviewed by MCH
on
April 12, 2015
Rating:
Reviewed by MCH
on
April 12, 2015
Rating:
Reviewed by MCH
on
April 12, 2015
Rating:


No comments: